Hello everyone, I’ve been working with OpenCV for 3 months now and working with it has been quite interesting so far. Today I’ll post of setting up OpenCV Project with Microsoft Visual Studio. Here are the steps. I’ll go through them one by one.
- Download OpenCV from http://opencv.org/downloads.html.
I’m using OpenCV 2.4.10. You can download it for Windows from above link. It will be a self extracting archive and you can extract it to a preferred location for example C:\OpenCV
2. Creating a Win32 Console Application
Start up Visual Studio. (I’ll be using Visual Studio 2012 these steps will be very much the same for 2010 and newer versions as well)
Go to File -> New Project
In there under Visual C++ select Win32 Console Application. You can give a name and select a location in that menu.

Then Win32 Application Wizard menu will pop up. Simply click next and following menu will pop up. Put the tick mark for Empty Project and click Finish.

3. Setting OpenCV path to System Environment Path
Now you must add $opencv\build\x64\vc11\bin to System Environment Path. Here $opencv means the installation directory and if you are using x86 bit OS then the path would be $opencv\build\x86\vc11\bin.
4. Configurations inside Visual Studio
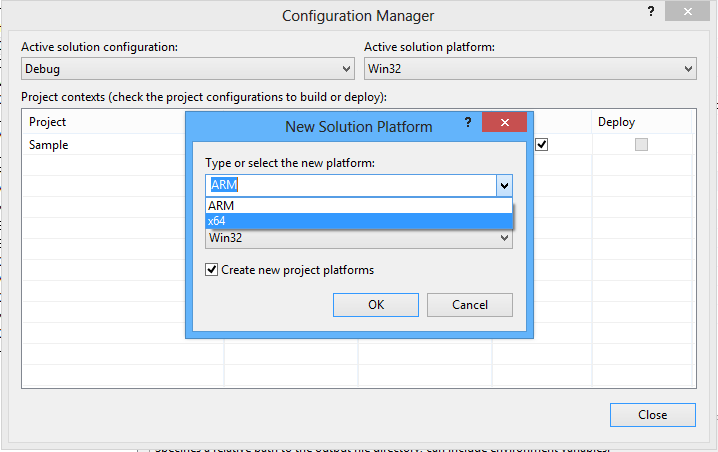
4.1 In the solution explorer right click on your project name and get properties. Then Property Pages menu will pop up. In that click Configuration Manager in right top to get Configuration Manager Menu. If you are using x86 bit OS then in active solution platform Win32 should be there by default. If you are using x64 bit OS then go to drop down menu as shown below and select <New…>

Here select x64 in New Solution Platform menu as shows below. ( Note that this is only if you are using x64 bit OS) Finally you can go back to Property Pages Menu.
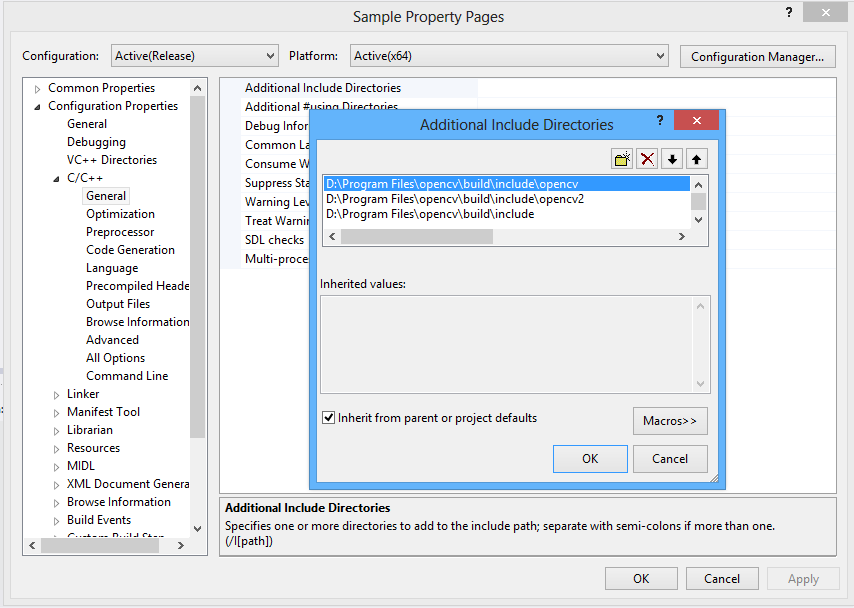
4.2 Property Configurations (C/C++ Additional Directories)
Here first select All Configurations as below.

Select C/C++ -> General -> Additional Include Dependencies and there in the drop down arrow in there select edit and following menu will pop up. There select new line (yellow icon) and on the appearing new line select the browse icon.

Then browse to $opencv\build\include and cilck select. Similarly add $opencv\build\include\opencv2 and $opencv\build\include\opencv directories too. So finally it would look like below.Then click OK.
4.3 Property Configurations (Linker Additional Directories)
As did before now select Linker -> Input -> Additional Library Directories and in the drop down menu select Edit and add $opencv\build\x64\vc11\lib (Note that if you are using x86 bit OS then this should be $opencv\build\x86\vc11\lib and $opencv is your OpenCV installation directory.
4.4 Property Configurations ( Debug Mode)
In configuration field choose Debug Mode. Then go to Linker -> Input -> Additional Dependencies and as before select new in drop down menu. Now copy and paste following in there.
opencv_stitching2410d.lib
opencv_contrib2410d.lib
opencv_videostab2410d.lib
opencv_superres2410d.lib
opencv_nonfree2410d.lib
opencv_gpu2410d.lib
opencv_ocl2410d.lib
opencv_legacy2410d.lib
opencv_ts2410d.lib
opencv_calib3d2410d.lib
opencv_features2d2410d.lib
opencv_objdetect2410d.lib
opencv_highgui2410d.lib
opencv_video2410d.lib
opencv_photo2410d.lib
opencv_imgproc2410d.lib
opencv_flann2410d.lib
opencv_ml2410d.lib
opencv_core2410d.lib
These are the library names located $opencv\build\x64\vc11\lib and here at the end of each name ‘d’ is there to denote debug mode.
4.5 Property Configurations ( Release Mode)
Now set configuration mode to release. Then again go to Linker -> Input -> Additional Dependencies and as before select new in drop down menu. Now copy and paste following in there.
opencv_stitching2410.lib
opencv_contrib2410.lib
opencv_videostab2410.lib
opencv_superres2410.lib
opencv_nonfree2410.lib
opencv_gpu2410.lib
opencv_ocl2410.lib
opencv_legacy2410.lib
opencv_ts2410.lib
opencv_calib3d2410.lib
opencv_features2d2410.lib
opencv_objdetect2410.lib
opencv_highgui2410.lib
opencv_video2410.lib
opencv_photo2410.lib
opencv_imgproc2410.lib
opencv_flann2410.lib
opencv_ml2410.lib
opencv_core2410.lib
Note that here ‘d’ is not there at the end of each name.
Now you are done with all configurations. Good Luck.
~Rajind Ruparathna
